
Introduction
While stairs serve a base function – as a means of ingress/egress to a deck – they can also be just as dramatic and expressive as any other element of a deck. Proper design and construction will ensure safe, functional stairs as well as an aesthetically pleasing component of your deck. In this article, we go over some of the basic concepts you should be aware of when getting started. As you might expect, due to safety reasons, there are some rules that you need to be aware of. But don’t look at these as limitations – they are there to keep your deck safe and leave plenty of room for your creative side.
Notice: This document does not replace your local building inspector or engineer when it comes codes relevant to your local jurisdiction. It is meant to introduce you to concepts you should be familiar with when starting a project. No warranty is provided. In this document we reference the 2021 International Residential Code (IRC).
Getting Started
Deck stair construction starts with deciding where you want to place your steps. This should not be taken lightly as it can have implications on the longterm utility of your deck. Considerations include the terrain where your steps will land below the deck. An uneven grade can require a lot of prep work in some cases and might dictate the placement of your stairs. Other considerations are obstructions that might block your plans. Depending on the height of your deck, your steps can extend out quite far beyond the edge of your deck (the greater the rise, the greater the run). Finally, don’t forget about the flow of your deck. Think through furniture placement and how you plan to use your deck space. You don’t want your steps to be blocked by the layout you really want. After you determine where you want your steps, next you want to determine the rise and run of your steps.
Rise & Run
If you are building steps from your deck to the ground, you will have some flexibility in the exact height you need to cover. This is achieved by adjusting the height of the landing pad (or whatever solution you “land” on – pun intended). This provides up to a few inches wiggle room which generally is good enough. If you are connecting two decks that are at different heights, you have a couple of options. You can ensure the deck elevations are a difference that fits the rise and run you want to use or you can produce custom stringers to fit the distance between the two decks. But be aware you do have limitations on the rise and run that you will need to adhere to.

Let’s start with the risers. The riser is the vertical component of the step. The 2021 IRC states that the riser height shall be not more than 7 3/4 inches. The riser shall be measured vertically between leading edges of the adjacent treads. And code also requires that you maintain consistency between the height of risers. The greatest riser height within any flight of stairs shall not exceed the smallest by more than 3/8 inch. So that is saying all risers must be cut to within 3/8 inch of each other. Most times, the risers will be at a right angle to the treads – that is straight up and down. However, the code does allow for risers to be sloped. Risers shall be vertical or sloped from the underside of the nosing of the tread above at an angle not more than 30 degrees from the vertical. The bottom of the riser can be rolled back to effectively allow for more tread space. Finally to prevent small children from falling through the stairs, openings located more than 30 inches above grade, as measured vertically, shall not permit the passage of a 4-inch-diameter sphere. So once your stairs exceed a height of 30 inches you need to keep an eye on those riser openings. If you are doing fully covered risers, you don’t have to worry about this part.
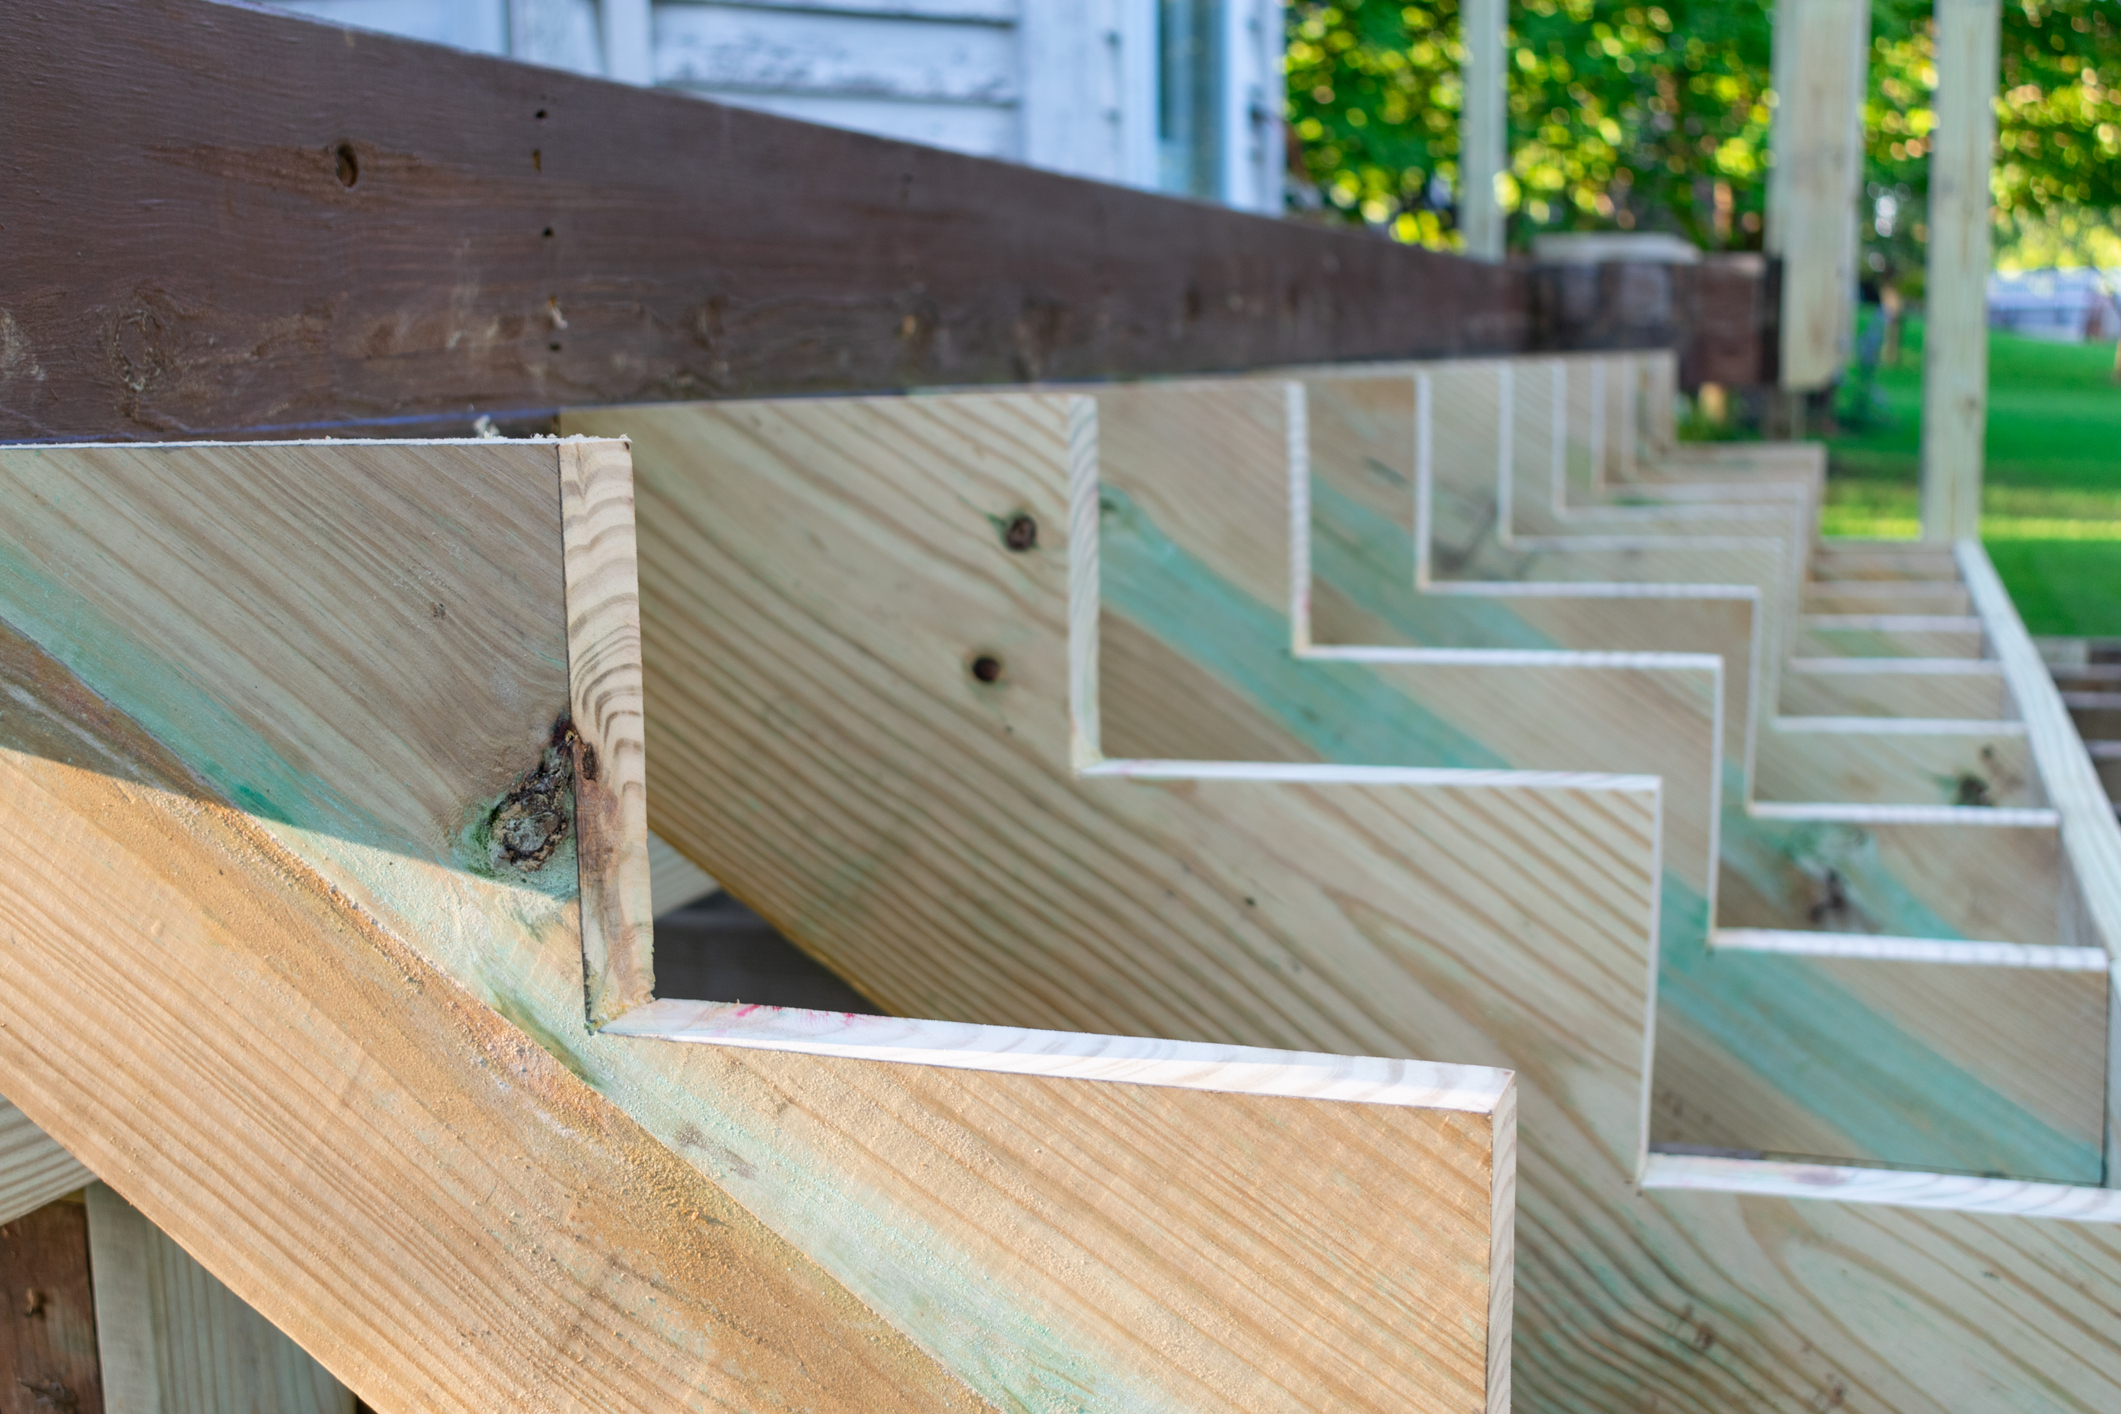
So that gets you most of what you need for the risers…let’s move on to the treads. The treads are the horizontal part of the stairs – the part that you actually step on. As you guessed it, the 2021 IRC isn’t silent on this topic either. The tread depth shall be not less than 10 inches as measured horizontally between the vertical planes of the foremost projection of adjacent treads and at a right angle to the tread’s leading edge. Anything less than 10 inches makes it a bit difficult for those of us with big feet. Once again, precision is important as the greatest tread depth within any flight of stairs shall not exceed the smallest by more than 3/8 inch. On the nosing projections, there are also some requirements. You need at least 3/4 inch projection but not more than 1 ½ inches. So if you are planing to install risers covers (which you are required to do at least partially if your deck is over 30 inches above grade), make sure your tread layout accounts for the riser material thickness. For example, if you are using 3/4 inch riser material, then on the stringers (without riser) you need at least 1 ½ inches of over hang (3/4 inch for the riser material + 3/4 inch for the over hang). Also, don’t forget about the riser on the step you are treading. Depending on your choice to place it behind the tread or on top, it will impact how much tread you need to meet your requirements (in the figure above, the risers are placed behind the treads).
Stair Width
A quick word on the width of the stairs. The 2021 IRC states that stairways shall be not less than 36 inches in clear width at all points above the permitted handrail height and below the required headroom height. The clear width of stairways at and below the handrail height, including treads and landings, shall be not less than 31½ inches where a handrail is installed on one side and 27 inches (698 mm) where handrails are installed on both sides. So with handrails on both sides, you have 9 inches to accommodate your railing selection. But a word of experience, you typically don’t want to stick with these minimums. Instead shoot for 42 – 48 inches to give a little more space for your claustrophobic friends.
Landings
Landings are required at the top and bottom of each flight of stairs. The landing must be the width of the stairs and 36 inches deep in the direction of travel. While you are free to cover any height you want with stairs, there are some limits to how much you can do in one stair flight. The maximum height you can cover with a single flight is 12 feet 7 inches. If going beyond that height, you will need to break it up with landings and multiple stair flights. These landings provide a resting space or in a worse case scenario, a place to try to stop falling.
There are different ideas regarding at-grade foundations for stairs. Practically all at-grade, bottom stair landings are floating on grade. They are not a minimum of 12 inches in undisturbed soil, and they are not frost protected. However, the stability of the landing elevation and slope are critical to maintaining the proper geometry of the first riser up to the first step. Placing the stringers on a floating slab will ensure the height of the first tread moves with the slab and so doesn’t change. Other solutions can open the possibility of the landing area moving independently of the first tread which is not ideal.
Stringers
Now that you know some basic building code associated with your stairs, we can start talking stringers. Stringers are the backbone of your stairs. Your stringers should meet a uniform load is 40 PSF and a concentrated load of 300 pounds. On the concentrated load, that is 300 pounds applied to a 2 inch x 2 inch square of the tread. So what does this mean? Well, beyond this there are no hard rules in the code on exactly how to build stringers. They are typically cut from 2×12 pressure treated material. These can be tricky to cut if you aren’t doing it frequently and depending on how many you are doing, it might be best to purchase pre-cut stringers. Regardless of whether you buy them or make them, one rule of thumb is that the thinnest portion of the board remaining after notching out the stringer should be around 5 1/4 inches.
Stringers are generally placed on 16 inch centers but you should be sure that your placement is consistent with the decking material you are using. For example there are some deck boards out there that require 12 inch centers. With 16 inch centers, a 48 inch wide stairway would require a minimum of 4 stringers. A minimum because depending on how you are installing your deck, you might need more. For example, if you are doing a border on the treads, you will need some additional blocking on the sides to support. We won’t go into more details on this here but will discuss it in a future article.
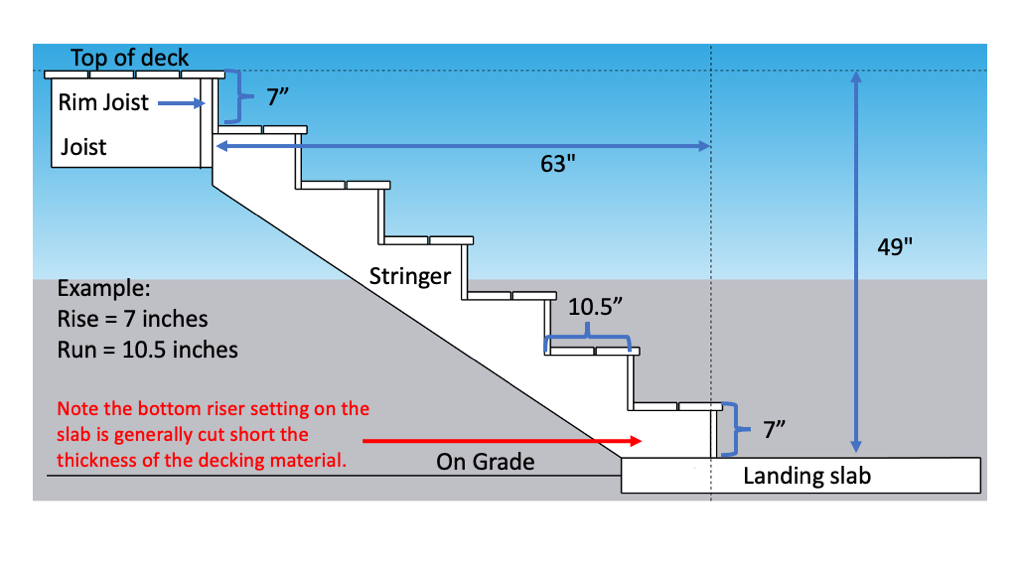
So now you have some basic concepts of stringers and you know how many you need. How do you determine the rise and run you need? If you have no requirements on exactly where you land, then you can simply pick a rise and run that meets code – lets say 10 inch run and 7 inch rise – and do the math. Let’s say you have 49 inches from the top of your deck (with deck boards) to the ground. Don’t forget to include your deck boards on the deck for this measurement or it will throw off your last step onto the deck. With 49 inches to cover, you will require a total of 7 steps (at 7 inches each). But keep in mind that generally the first step off the deck goes down to the first tread on the stringer. In other words, your first riser is effectively the rim joist of the deck. So your stringer really only needs 6 risers. When it comes to stringers, every riser has a tread – so this means you will have 6 treads on the stringer. This also means that with a 10 inch run, your steps will have a total run of 60 inches. If you steps are running perpendicular to your deck then they will project out 60 inches (6 treads X 10 inch runs). With a 10.5 inch run, your stairs would extend out 63 inches (6 treads X 10.5 inch run). You can start to see how you can adjust your run to land in a specific spot. But you will also see you have some limitations. For example, if your steps needed to land in under 60 inches, then you wouldn’t be able to hit this mark with this particular rise & run combination. You would need to increase your rise a bit to hit this mark but keep in mind you can only go up to 7 3/4 inches on the rise and stay within code requirements.
Let’s get a little more complicated. Suppose that your total height isn’t a multiple of the 7 and you have hard requirements on the total run of your steps. Then you have to adjust both the rise and run while staying within the code requirements. In this example, let’s say you have 37 inches to cover from the top of your deck boards to your landing slab. We can try some riser counts. For example with 4 risers we would have a rise of 37 inches divided by 4 which yields 9 1/4 inches. Remember our code says 7 3/4 inches is the max we can have so 4 steps won’t work.
Let’s try 5 steps. Then, 37 inches divided by 5 yields 7.4 inches. This is less than the code max of 7.75 inches so this riser count will work. Now let’s say we need to hit grade before 57 inches horizontally. Be careful here. We have 5 steps up but remember one of them is the rim joist on the deck so we need to take away one tread from our measurement. So then we can check if 4 steps would be code compliant by dividing 57 inches by 4 which yields 14.25 inches. Remember our code says we need at least 10 inch treads – 14.25 inches exceeds that so we are technically good but that is a pretty wide tread.
What if try one more number. Let’s increase the steps to 6. Now our riser would be 37 inches divided by 6 steps which yields 6.17 inches. That isn’t too bad – it is definitely code compliant (i.e. below 7.75 inches). Now our tread would be 57 inches divided by 5 steps (remember to take one away) which yields 11.4 inches. Again this is code compliant and closer to a typical tread depth. So with that, our rise and run ends up being 6.17 inches and 11.4 inches respectively.
One other thing to keep in mind is that the last riser on the stringer when the stringer is landing on a non-decked surface such as a concrete pad, is typically cut down by the thickness of the deck board. This is to account for the fact that the stringer is setting on a surface that will not have a deck board and consequently doesn’t require as much height to account for his.
That is the basic jist of determining what rise and run you need to satisfy your requirements. Fortunately, most times you will have only a height requirement which makes the task a bit easier. But even in cases where you have both vertical and horizontal requirements, you now know how to tackle the problem.
Conclusion
In this article, we covered some basic design considerations for creating deck stairs. We didn’t get into deck board placement or railing. But rest assured, we will cover those details in future articles.